Many Revit users fail to discover this soon enough.
Difference between changing a pattern directly from the material editor and changing it from Visibility and Graphics?
A few days ago, I received a question from one of you about a short I recently published!
The question was about whether patterns applied to elements can be seen in only 3D view or if they are also visible in 2D views?
The answer is actually both!
When you apply a pattern to a floor or wall, you can see it in all views as long as you have the correct settings for each view, such as scale or visual style.
Then, they followed up with a very smart question...


Do you know the answer? I'll wait...
To answer this, I first need to explain the difference between Category, Type, and Elements.
Categories in Revit are large and main groups that serve specific purposes. Examples include the Wall category, Floor category, Windows category, Architecture Column category, Structural Column category, Tag category, and so on.
Within each category in Revit, there are different Types. These types can be default options provided in the template or custom types that we create ourselves. For example, within the Wall category, we may have different types such as wooden wall, concrete wall, interior gypsum wall, and so on.
In Revit, each individual component that we create or model is considered an Element. This means that a wooden 2.5m height wall is an element, and another wooden 2.5m height wall is also considered a separate element, regardless of whether they belong to the same category or type.
Each element in Revit is assigned a unique Element ID, which helps to differentiate and identify them within the project. This allows users to easily locate, manage, and make changes to specific elements within their Revit project.
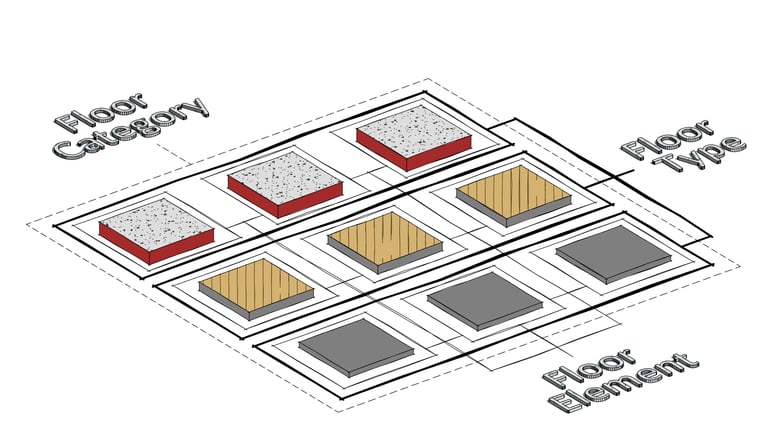
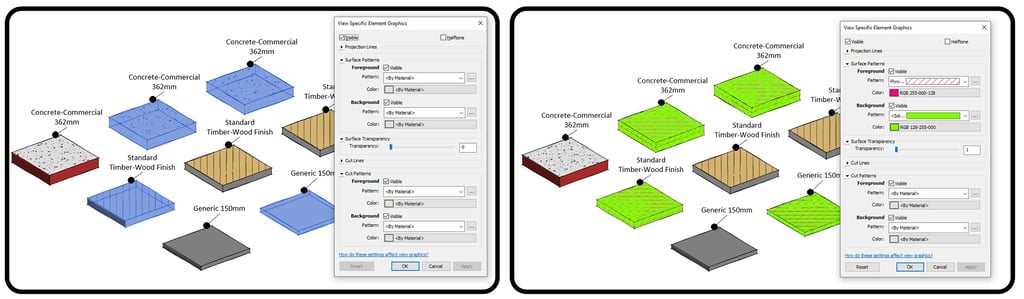
Let me rephrase the text in a different manner. Consider this visual example.
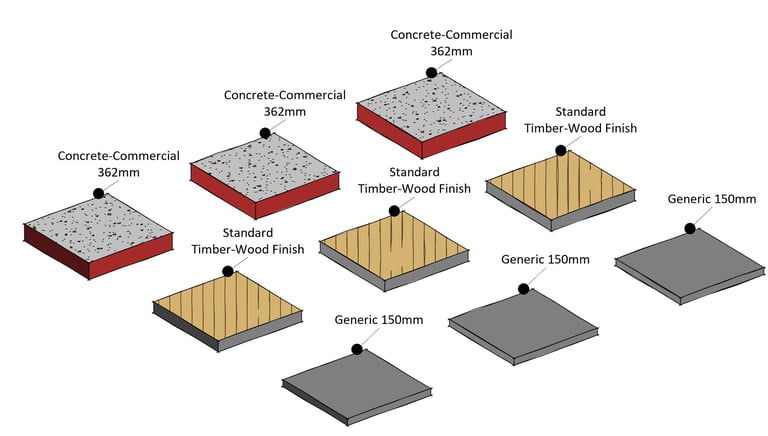
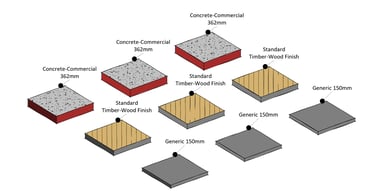
How many Categories do you see? How many Types are there here? What about Elements?
Here, we have only 1 category, which is the Floor category.
There are 3 different types of floors within this category: Concrete, Timber Wood, and Generic 15cm.
And obviously, we have 9 elements. (Let’s just ignore tags for a moment )
With this information in mind, let's revisit the question:
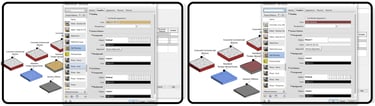
What is the difference between changing a pattern directly from the material editor and changing it from Visibility and Graphics?
When we change a pattern from Visibility and graphic, it affects the pattern of the entire Category. Regardless of how many different types or elements are within that category, all of them will be changed.
For example, in a flat with various rooms such as 2 bedrooms with different flooring types (one with wooden parquettes and another with full carpet finish), a living room, bathroom, kitchen, etc., changing the floor pattern from Visibility and Graphics will result in all of these rooms having the same flooring pattern, even if they are of different types.
However, it's important to note that these changes will only be applied to the specific view that you are in.
Therefore, if you change the visibility and graphic settings in the First Level view, the pattern of the floors in the 3D view will remain unchanged. Each view can have its own distinct visibility and graphics settings that do not affect other views.
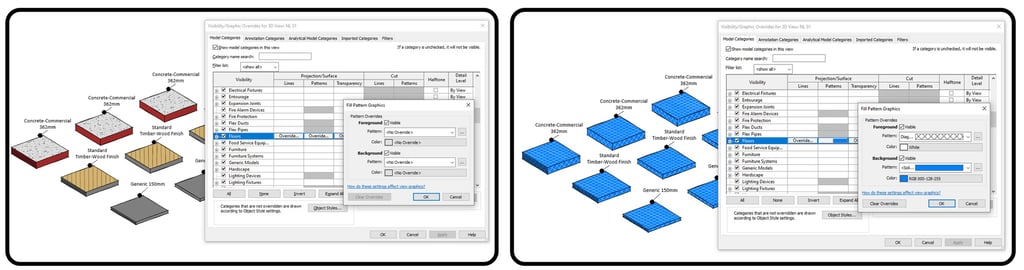
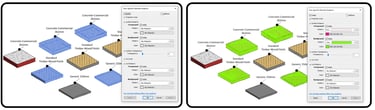
On the other hand, when we change a pattern from the material browser, it affects the pattern for the entire Type. The other types in that category will remain the same.
For instance, in the image below, if we select the wooden floor and change the pattern of the finish layer, the pattern of all floors with that same Type will be changed.
In another scenario, if we have created a specific floor type for the kitchen in our project and have multiple units with different sizes, changing the pattern of the kitchen floor type will automatically update the pattern for all kitchen floors without affecting any other floor types.
In essence, changing a pattern from the material browser alters the pattern for that specific Type.
The important point to note is that this changed pattern will be visible in all views, for all elements that share the same Type or have that particular material applied.

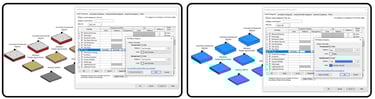
In situations where you only need to change the pattern of a specific Element, such as changing the color of wallpaper for just one wall in the master bedroom, it is not ideal to change it from the Visibility and Graphics settings, as this would affect all walls in the project. Similarly, changing it from the material browser would also apply the change to all walls with that wallpaper. Right ?
In such cases, the Override by Element function can be used. This option allows you to change the pattern of individual elements regardless of their Type or Category. By selecting a wall, floor, lighting fixture, line, or any other element, you can easily modify their pattern using Override by Element.
To access this option, first select the Element or Elements you want to modify, then navigate to the Modify tab. In the View panel, look for the Override by Element option, typically represented by a small brush icon.
This allows you to make specific pattern changes without affecting other elements in the project.
There are various ways to adjust patterns for different elements based on the specific situations and project requirements.
By mastering these techniques early on in your journey, you can save time and avoid frustration with the software. Instead, you'll be able to unleash your creativity, play with the tools effortlessly, and enjoy your project work, making the most of your day.
Here is a related video to this topic. If you are interested in delving deeper, you can watch it.

Hope you enjoyed this first newsletter! Your feedback matters, so don't be shy - hit reply and share your ideas.
I want to create content that's perfect for you, so tell me what you want to watch or read next!
Reach out anytime.
Your essential resource for Revit and BIM expertise. Find our comprehensive courses, professional families, and expert blog to elevate your skills.
© 2025 RVT PLUS. All rights reserved.
Quick Access
Recent Articles
Explore Our Shop